In my opinion, the Icefields Parkway is the most scenic part of the Canadian Rockies. Separating Lake Louise and Jasper, the spine of the continent runs along this corridor. Ageless glaciers cling to ice-carved peaks above while brilliant blue lakes and green forests color the parkway’s deep valleys. Despite my affinity for the area, however, there is a massive chunk of it that I have not explored. Indeed, the 65 km stretch between Observation Peak to the south and Parker Ridge to the north has stood out as a glaring omission on my summit map for many years.
Seeking to finally rectify this unacceptable situation, I decided to attempt a scenic outlier of Mount Murchison: Bison Peak. Bison Peak sits near the middle of my Canadian Rockies “blind spot” so the promise of novel views from its summit was particularly alluring. Equally alluring, was Bison’s “hands-on” route, first published by Pole and then popularized by Dewit. Of late, my peak-bagging adventures have been more of the “hands-in-pocket” variety so I was looking forward to challenging myself on some steeper terrain!
And, speaking of steep, Bison Peak is STEEP. When I consulted my topo map and noted that the summit sat 1.3 km above the highway and only 2.2. km east of it, I was convinced that there must have been some cartographic mistake! Having now scrambled Bison, I can confidently say that the maps are correct. Bison is one steep m*ther! Others have categorized Bison as "Class 2/3" or "moderate with a difficult feel." Bullocks. Bison was more difficult than other difficult scrambles I’ve completed. Because of the sustained nature of the scrambling, the route finding, the looseness of the steep terrain and the potential for rockfall, I think Bison should be called what it is: a difficult scramble.
.jpg)
Having anticipated a certain degree of “spiciness,” I decided that Bison wouldn’t make for a good solo venture and reached out to a couple of partners who I thought might be interested. Happily, la folle Française (Aurore) agreed to join me. After a 5 am departure from Calgary, we arrived at an, unexpectedly, spacious roadside pullout 6.3 km north of the Waterfowl Lakes campground on the Icefields Parkway. With Mount Murchison’s substantive shadow still cast across the valley, we began our adventure!
.jpg)
As the sun rose to the east, the moon set to the west between Epaulette Mountain and Kaufmann Peak.
.jpg)
After crossing the highway, we started up Bison’s flank, enjoying early morning views of Mount Chephren and White Pyramid before plunging ourselves into the brush.
.jpg)
.jpg)
LEFT: While the forest above Highway 93 was steep, it was (mercifully) thin as well and bushwhacking was generally non-existent. Photo courtesy Aurore Kurc.
RIGHT: Aurore is still smiling but that will soon change… 🤣
.jpg)
Although the forest didn’t allow for sweeping mountain views, there were discoveries here and there that kept us interested as we slogged up through the thin underbrush.
.jpg)
After ascending about 200 vertical meters in the woods, we crossed a section of “pick-up-sticks” deadfall to reach a prominent avalanche gully. Note that the smile on Aurore’s face has diminished somewhat…
.jpg)
.jpg)
LEFT: From the avalanche gully, Bison’s fierce west face towers overhead. Following Dewit’s excellent route description, we aimed for the mostly dry creek bed and started up there. While the Explor8ion route description is spot-on, I note that its GPS track is out to lunch and does not ascend the route the website describes. If you attempt Bison, it would therefore be best to familiarize yourself with the route description instead of relying blindly on a GPS track
RIGHT: Aurore’s smile returned as we “grasswhacked” our way up the avalanche runout towards the drainage.
.jpg)
Epaulette Mountain, Kauffman Peak and Mount Sarbach made for a stunning backdrop as we ascended.
.jpg)
As we ascended, we found the fork in the drainage and followed the narrower, northern (climber’s left) watercourse.
.jpg)
.jpg)
LEFT: Fine scrambling to be enjoyed in the steep, northern drainage! At one point, we heard a frightening “BOOM” while we were ascending and looked uneasily up the gully for signs of impending rockfall. Fortunately, none materialized but the steep, narrow confines of this feature make it a good place to wear a helmet and a poor place to linger! Photo courtesy Aurore Kurc.
RIGHT: The drainage’s narrow confines limited the view to one direction (behind us). Fortunately, that view proved to be a good compliment to the gully’s enjoyable hands-on scrambling.
.jpg)
The wall of rock that Dewit describes at the top of the northern drainage. While his comment relating to this section was simply “No problem!”, we felt that it deserved more respect than that. In fact, the hardpack dirt that surrounded the rock was, in fact, a potential problem…
.jpg)
Aurore and I climbed the rotten hardpack dirt to the north (left) of the rock wall and, to be frank, it scared us both. The ground was so hard that our boots couldn’t dig in at all and the steepness and lack of purchase meant that a slip would likely send us back down this cheese grater-slope. A misstep here wouldn’t kill but it would remove most of your skin! The remainder of the ascent was far from easy but this was the only section that we agreed we would not descend.
.jpg)
Above the godawful hardpack, we found dirt that actually had some give to it and followed it up to the climber’s left (north) on a rising ramp feature.
.jpg)
.jpg)
LEFT: At the top of the dirt ramp, we discovered the ledges that lead to a buttress high above. There are many difficult lines up this section and at least one moderate-ish one. By picking our route carefully and exploring back and forth, we were able to find a class 3 way through this labyrinth.
RIGHT: As the ledges steepened, Aurore despondently wondered where the hell the moderate route was. As I reflect on this section, I’m on the fence as to whether I’d call it moderate or difficult. No one move ever felt absurdly committing. Having said that, Aurore is a climber and she said that she’s been on roped routes that were not this steep or technical. Again, I feel that the sustained nature of the scrambling and route-finding here justify a “difficult” scramble rating.
.jpg)
About halfway up the ledges, the rising sun provided an additional route-finding challenge. It’s a little tricky to pick the best route when you’re staring straight into that!
.jpg)
.jpg)
LEFT: Higher up, the ledges became wider and more scree-covered, allowing for easier back-and-forth travel.
RIGHT: Aurore enjoys the amazing view towards Mount Chephren and White Pyramid from a scree ledge that was wide enough to, briefly, rest upon!
.jpg)
Epaulette, Kaufmann and Sarbach continued to dominate the panorama to the northwest as we ascended ledge, after ledge, after ledge (click to see larger). At the point that this photo was taken, we reached an impasse for several moments. On the right side of the photo, a wall of steep rock blocked our path. A little further to the climber’s left, however, an impassibly steep and deep gully rose straight up. The key here, as we discovered, was a narrow, scree ledge which lay between the rock wall and the gully and provided a tenuous switchback up.
.jpg)
The key scree ramp which “threaded the needle” between the rock wall and the vertical gully is obvious here. It was neither as bad as it looked nor was it trivial.
.jpg)
Our route-finding burden on the ledges was eased significantly thanks to the presence of brightly flagged pink cairns at key points. These weren’t always visible from below but they provided a very welcome confirmation that we were on route as we ascended. Clearly, Aurore was appreciative! 😘
.jpg)
A final wall of rock to overcome before completing the “ledges” section of the scramble. This one looks mildly badass in photos but was actually pretty easy! 😂
.jpg)
Upon completing the ledges, Bison Peak’s next obstacle became readily apparent: the steep, loose ascent gully (center) which cleaves its 2 prominent sub-summit buttresses. Before tackling the gully, we took a small break to refuel and to mentally prepare for the upcoming suffer-fest.
.jpg)
.jpg)
LEFT: Like the rest of Bison, the gully is neither impossible nor is it pleasant. It is a means to an end. A STEEP means to a STEEP end.
RIGHT: The gully offers ample slogging of egregiously low quality.
.jpg)
.jpg)
LEFT: The gully also offers occasional and delightful opportunities for hands-on scrambling.
RIGHT: But mostly awful slogging on loose, blocky rock. 🤣
.jpg)
Bison’s sub-summit buttresses nicely frame the unfolding icefields panorama at our backs.
.jpg)
Above the steep gully, only a foreshortened 275 vertical meter scree slope remained. At this point, we took another break to mentally prepare ourselves for the final grind.
.jpg)
As you can see, Aurore was “rearing to go” when she saw the final scree slog ahead. 😝 After a short rest, we eventually decided that the mountain “wouldn’t climb itself” and continued up.
.jpg)
.jpg)
LEFT: As we slogged up the final, longer-then-it-looks, slope, I noted that Aurore’s pace had decreased significantly. After asking if I could carry her pack to ease her burden a couple of times, I finally insisted. To ensure that this act wasn’t misconstrued as me being “nice” or “a decent human being”, I made sure to take a selfie of “porter Matt” while Aurore suffered below!
PS: Holy hell your pack is heavy Aurore!!! 🤯
RIGHT: She's definitely not smiling anymore! 🙃
.jpg)
Because Bison Peak would not just go quietly into that good night (or afternoon as the case may have been), the rock bands at the top of the scree slope proved to be more formidable up close than they’d appeared from below. They were still easy scrambling but, at this point, we were ready to see a summit cairn and wandering back and forth up these small walls with a pack on my back and another, heavier one, on my chest proved tiresome.
.jpg)
SUMMIT CAIRN! THANK GOD! 🙏 🤩
.jpg)
.jpg)
LEFT: The original register left by Graham Pole during his 1988 first ascent! Note also the lack of a second entry until 2015 (although Vern Dewit obviously made it in 2013 as well).
RIGHT: Aurore and I add our 2 cents. Aurore, in particular, had some choice words for Bison… 🤬 😲
.jpg)
As one might expect, the panorama to the north of Bison Peak was dominated by behemoth Mount Murchison and its many, many towers. From left to right: Feuz Tower, Mount Murchison (distant center left), Gest Tower, Bison Tower, Engelhard Tower, Cromwell Tower and South East Tower. Click to see larger.
.jpg)
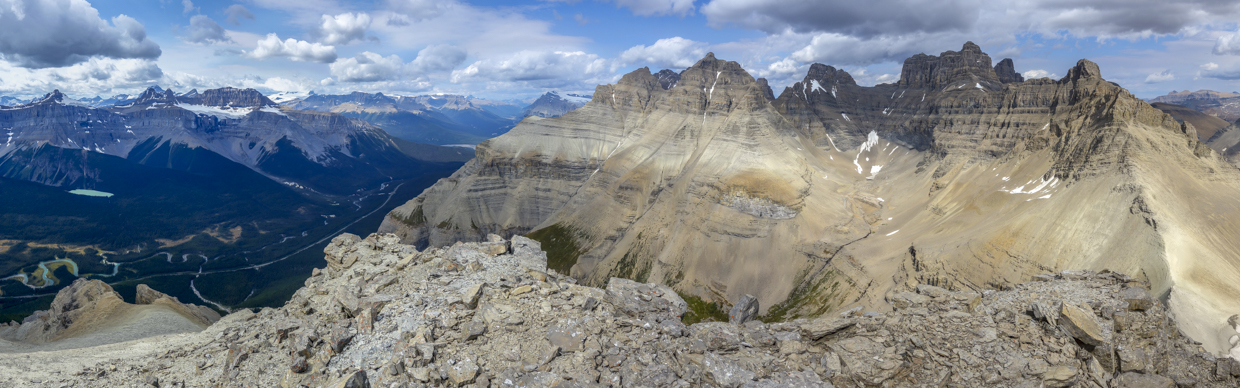
Contrasting landscapes dominated the panorama to the southeast. On the left lay a rocky moonscape, almost devoid of life. To the right, verdant forests surrounded the Icefields Parkway’s many glacial lakes. Click to see larger.
.jpg)
Mount Peskett (center left) and Siffleur Mountain (center right) rise up beyond more proximate Corona Ridge.
.jpg)
Totem Tower (left), South Totem Peak (center left) and Spreading Peak (center) reside immediately to the south.
.jpg)
Seven spectacular glacial lakes can be seen beyond Bison’s crumbling south ridge in this wide-angle shot including (from left to right): Bow Lake (distant), Peyto Lake (distant), Mistaya Lake, Waterfowl Lakes, Cirque Lake and Chephren Lake.
.jpg)
Reveling in the novel summit scenery (44 km south of Parker Ridge and 21 km north of Observation Peak)!
.jpg)
A host of peaks south along the scenic Icefields Parkway including (from left to right): Bobac Mountain, Watermelon Peak, Mount Noyes, Mount Weed, Observation Peak, Bow Peak, Storm Mountain, Bowcrow Peak, Mount Temple, Crowfoot Mountain, Vulture Peak, Mount Daly, Mount Balfour, Mount Olive, Mount Patterson, Mistaya Mountain and Trapper Peak (to name a few).
.jpg)
A closer look at Bow Peak, Crowfoot Mountain and Mount Jimmy Simpson over Bow Lake and Peyto Lake to the south. Distant giants including Mount Assiniboine, Storm Mountain, Mount Ball, Mount Temple, Mount Lefroy, Mount Victoria and Hungabee Mountain are also visible despite the late summer haze.
.jpg)
Mount Patterson towers above Mistaya Lake.
.jpg)
Tiny Cirque Lake is dwarfed by a host of icefields giants. From left to right: Peyto Peak, Mistaya Mountain, Mount Baker, Barbette Mountain, Ayesha Peak, Mount Des Poilus, Aries Peak, Breaker Mountain, Stairway Peak and Midway Peak.
.jpg)
The imposing trio of Howse Peak (center), Mount Chephren (center right) and White Pyramid (right) tower above Chephren Lake’s silty waters.
.jpg)
A spectacular, lake-filled, glacier-filled and peak-filled panorama sweeps from Bow Summit (left) towards Saskatchewan Crossing (right). Click to see larger.
.jpg)
Aurore enjoys a cozy summit perch while playing an entertaining game of “Name that Lake!”
.jpg)
Across the highway, the trio of Epaulette Peak, Kauffmann Peak and Mount Sarbach form a sheer wall of rock beyond Epaulette Lake and the winding Mistaya River. The tallest peak in Banff National Park, Mount Forbes, is also visible just behind Kauffmann in the center of the photo.
.jpg)
Mount Sarbach is a spectacular beast of a mountain. To its left, Mount Outram is clearly visible while the 11,000ers of the Lyell Icefield can be seen to its right.
.jpg)
Familiar peaks of the Columbia Icefields are visible to the north beyond Saskatchewan Crossing. From left to right: Mount Amery (summit just out of the shot), Mount Athabasca, Boundary Peak, Parker Ridge, Tangle Ridge, Nigel Peak, Wurzburg Peak, Andover Peak and Nosecone Peak.
.jpg)
Mount Wilson and its massive icefield preside over nearby Saskatchewan Crossing.
.jpg)
Bison Peak’s full northern panorama, from Epaulette to Murchison (and filled mostly with Murchison!). Click to see larger.
.jpg)
After a 45 minute summit sejour, soaking in spectacular scenery, we played the 10 second timer game with my camera balanced on a backpack balanced on a rock before beginning, what we expected would be, a challenging descent. If it looks like Aurore is laughing, that’s probably because my camera was about to fall off a cliff. 😂
.jpg)
.jpg)
LEFT: The journey of a thousand butt-scootches begins with a single step (ask Aurore how her pants fared on the way down)…
RIGHT: Aurore enjoys a brief respite from descent-related anxiety on the peak’s upper scree slopes. The same scree that nearly did her in on ascent proved most pleasant to plunge step down and, for a brief time, we enjoyed a speedy descent.
.jpg)
.jpg)
LEFT: Aiming for the gully of doom between Bison’s extremely obvious sub-summit buttresses.
RIGHT: What goes up, must slowly and painstakingly go down! Note that Aurore’s smile is, once again, absent…
.jpg)
After managing not to rain death boulders down upon one another in the gully, we stopped briefly to enjoy another mental recharge on Bison Peak’s only patch of grass.
.jpg)
Below the grass, we started down the ledges where a pink-flagged cairn (foreground right) easesd our trepidation as we searched back and forth for a reasonable way down.
.jpg)
.jpg)
LEFT and RIGHT: Aurore’s face tells the story of our careful descent back-and-forth along Bison’s steep mid-mountain ledges.
.jpg)
.jpg)
LEFT: Following a dwindling scree ramp down and north towards the key scree switchback which allows the scramble to be kept within the realm of sane (🤪).
RIGHT: Aurore rounds the key scree switchback with blinders on to ignore the precipice below her.
.jpg)
As noted on ascent, the lowest ledges were also the steepest ledges. Below a pink ribbon in a tree beckons and signals the end of the day’s technical challenges.
.jpg)
Aurore clings to the steep terrain as she completes the final ledges. Are we having fun yet?
.jpg)
Having completed the ledges, we found ourselves back at the godawful hardpack which leads down into the drainage that we ascended hours earlier. Fortunately, the forested slope to the right was passable and allowed us to bypass this dangerous section on our way down!
.jpg)
The lazy Mistaya River reflects the evening light as we descend the forested shoulder to the north of our ascent drainage.
.jpg)
.jpg)
LEFT: Typical terrain on the forested descent shoulder. While our descent here was steep it was remarkably easy compared to the rest of our day’s travels! It was very nice to finally let our guard down a little at this point!
RIGHT: Even from the forest, views of Mount Chephren and White Pyramid continued to impress us.
.jpg)
Aurore navigates a final slope to descend to the avalanche clearing below the drainage. One could also ascend this slope to bypass the godawful hardpack, however, this would deprive you of the pleasant warm-up scrambling in the first drainage. From here, all that remained was a 1 km bushwhack back to the highway below…
.jpg)
Aurore yawns as we hike easily back along the highway towards our car (while boorish drivers thoughtlessly blast by). Fortunately, the highway’s hardpack was much grippier than the godawful stuff above and we soon found ourselves back at the roadside pullout some 9.5 hours after first setting off from there. As such, we completed our STEEP adventure in the heart of my Canadian Rockies “blind spot” (all while setting a record for slowest scramble ever: 8.5 km distance covered in 9.5 hours)!
Bison is one steep (but spectacular) m*ther!
.jpg)
.jpg)
.jpg)
.jpg)
.jpg)