164 days. When I set out to scramble Mount Howard on June 9, that’s how long it had been since I last attempted a peak in the Canadian Rockies. Perhaps that’s how long it took me to want to climb a mountain again after my last snowshoe ascent? 😝 Perhaps I was just too busy with family commitments? Maybe I lead a double life and was climbing fences to access sensitive Government property in Istanbul? You’ll never know… 😇😏
Whatever the reason, 164 days is a long time for Matt to go without a proper peak, so when my wife casually mentioned that I could go for a scramble on Sunday June 9, I wasted little time, and was out the door by 5:30 am (before she had the chance to wake up and change her mind)!
So why Mount Howard? Well, Howard always looked like a lovely ridge walk to me, but, with its position just west of Bragg Creek, I’d been saving it for a spring ascent so that the surrounding front range peaks would still sport scenic snow caps. Of course, these front range peaks may still be snowy in August at the rate this season is going, 🙄 but that’s beside the point. I wanted to enjoy Howard in early season conditions, and June 9, 2024 looked like a great chance to do so. As an added bonus, Howard’s proximity to Calgary meant that I’d spend significantly more time on the mountain than in the car on my way to it! And last, but not least, it had been 4,041 days since my last hike up the Canyon Creek approach so I’d forgotten how long it feels. 😂
.jpg)
After successfully dodging 17 deer, 4 wild horses, 2 moose and 1 hare on my drive into Kananaskis, 🦌🐎🐇 I arrived at the Canyon Creek parking area at 7:00 am. The temperature was 2 C and fog swirled all about. 🥶 More alarming, there was still snow at the trailhead (which is over 1,000 meters lower than Mount Howard’s summit). I’d wanted snowy views on Howard and it looked like 2024 was going to make that happen (for better or worse). 😬 While I’d hoped not to run into snow until I was much higher, I decided to make the best of the snowbank by my car and threw some of the cold white stuff into my cooler to keep my post-scramble beverage chilled while I was away.
.jpg)
As I hiked up Canyon Creek, the fog and clouds parted occasionally, providing views of nearby Compression Ridge’s impressive ramparts.
.jpg)
Canyon Creek must be the most deceptively named feature in K-Country, as there’s really nothing resembling a canyon along its course! In fact, most of the “creek” is a dry, rocky floodplain, which is as flat and wide as a football field! As a result, I was able to enjoy fine, panoramic views of impressive cliffs at the base of Compression Ridge (left) and Mount Bryant (right) as I hiked towards Howard (center right). Click to see larger.
.jpg)
Since I was solo on this outing, the open approach also made me less anxious about the possibility of surprising a bear 🐻 while I hiked 5.5-km from the car to Mount Howard’s base (which finally appeared an hour after I started up Canyon Creek). This photo shows Howard’s ascent slopes at center, complete with a nice trail. From the creek bed, the ascent climbs up and over the false summits in the center, before ascending the much snowier peak to their left. The true summit of Howard is behind this snowy peak and still not visible from here.
.jpg)
After a 75-minute plod up Canyon Creek, it was time to start gaining elevation in earnest on the trail visible here.
.jpg)
.jpg)
LEFT: While the trail started out in the open, it quickly entered the forest.
RIGHT: Not long after it did, the snow started to pile up, making the trail a little more difficult to follow.
.jpg)
After a very brief ascent through the woods, the terrain on Howard’s north ridge opened up again. From here, ascending was as simple as following your nose. Having tired of rocky rubble during the walk up Canyon Creek, my nose decided to don gaiters and ascended the snow straight ahead. Thanks to the day’s cool and cloudy start, this snow was firm and perfect for:
A. Kicking steps.
B. Ascending quickly.
C. Reminding me that I’m out of mountain shape.
.jpg)
After huffing and puffing my way up the lower snow slope, I reached the first of many (5!) false summits and was finally granted a view of the remaining ascent. From here, the route followed the ridge up and over a couple of bumps on the right, before dropping to the snowy col at center left, and finally ascending up and over 2 more snowy peaks to reach the true summit (the distant peak visible on the left). While I’d been expecting some snow, the amount that I saw ahead of me was slightly unnerving… 😐
.jpg)
While the snow ahead filled me with angst, clearing skies urged me onwards with views, like this one, of Mount Bryant and my long Canyon Creek approach.
.jpg)
The ridge had a number of ups and downs, but the elevation losses weren’t really significant and many of them featured scenic pinnacles and rock formations.
.jpg)
From the top of the 3rd false summit, I got the best glance yet at the path ahead: down to the col and then up and over 2 more snowy false summits before, hopefully, reaching the top of Mount Howard successfully. Both of the intervening false summits can be avoided by side-hilling around them. In fact, the nearest high point’s side-sloping bypass path can even be seen in the scree/snow to the right of it. While I wasn’t keen to gain more elevation than I had to, I couldn’t help but notice that this bypass was completely snow-covered and that it ran out over some pretty big cliffs… 🤔😬
.jpg)
.jpg)
LEFT: Enjoying a nice mix of rocky ridge walking and hiking along the crest of the snow arete between false summits #3 and #4. As I continued up the ridge, I debated whether I should continue straight up steep scree/snow slopes or whether I should follow the bypass trail through the snow…
RIGHT: Although the bypass trail didn’t look awful when I reached it, I gave the snow a quick kick and decided that it was much firmer/icier than I cared for. Remembering the steep cliffs below (that were no longer visible from above), I decided that the safest course of action was to continue straight up scree/snow slopes towards false summit #4. These slopes were very steep, but there was no hazardous terrain below them in the event of a slip!
.jpg)
.jpg)
LEFT: Starting up steep, frozen scree to avoid the potentially hazardous bypass trail… 😑
RIGHT: Higher up, the scree disappeared and I was forced onto steep snow (note that my tracks become invisible as the slope in the foreground steepens beyond a roll). Obviously, I took care on this section but I was 100% confident that any slip would’ve had minimal consequences. Basically, I’d just have to regain the elevation that I slid down if I lost my footing! 🙃
.jpg)
As I gained Howard’s 4th false summit, I noticed (for the first time) that the skies hadn’t cleared everywhere. Indeed, there was an awesome inversion over the foothills and prairies on the other side of nearby Compression and Nihahi Ridges! 😍 Click to see larger.
.jpg)
Finally, Mount Howard (left) looks somewhat close – only 1 more false summit to go! Once again, this last high point can be bypassed by side-hilling but, once again, I decided that going straight up and over it would be simplest and safest in snowy conditions.
.jpg)
As I hiked up to the next high point, a sightseeing helicopter buzzed by. 🚁 Those aboard were treated to the same views I was enjoying but deprived themselves of all the high-quality suffering that’s usually required to get them!
.jpg)
As I continued up, up, up, panoramic views over the snowy cirque to the north of Mount Howard proved too pretty to pass by without getting my camera out. Click to see larger.
.jpg)
.jpg)
LEFT: Howard’s 5th false summit took on an increasingly rugged air as I got closer to its apex!
RIGHT: Luckily its intimidating ridge crest could be easily by-passed by kicking more steps up open snowy slopes to the climber’s left.
.jpg)
On final approach at last! With Howard’s many false summits behind me, one final snowy pyramid was all that was left to ascend.
.jpg)
.jpg)
LEFT: Although Howard’s summit block looked tame from afar, it proved steeper once you got close, allowing me to finish the ascent with a fun, but easy, scramble. 😊
RIGHT: A final snowy arete leads to the summit of Mount Howard.
.jpg)
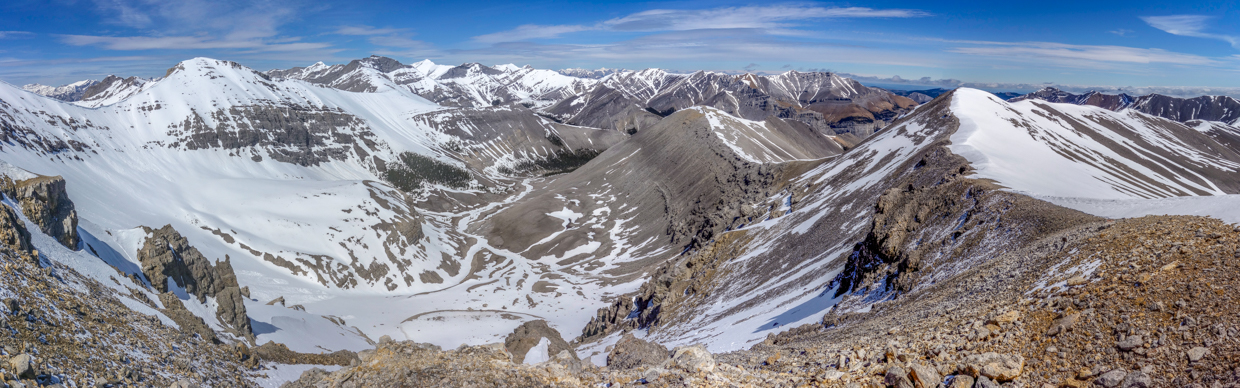
Spectacular panoramic views over and beyond the snowy cirque to the east from the summit. 😍 Click to see larger.
.jpg)
As the inversion to the east cleared, Jumpingpound Mountain (center left) and Moose Mountain (center right) were revealed beyond nearby Compression Ridge.
.jpg)
A closer look at Moose Mountain and its fire lookout-topped summit.
.jpg)
Looking southeast towards 6-km-long Nihahi Ridge and a host of scattered cloud and foothills beyond it.
.jpg)
A very snowy, southward summit panorama. #IsItJuneYet? (Oh wait, it is) 🙄 Click to see larger.
.jpg)
Mount Fullerton rises up directly to the south with a host of familiar K-Country peaks beyond (including, from left to right: Threepoint Mountain, Bluerock Mountain, Pyriform Mountain, Mount Glasgow, Banded Peak, Mount Cornwall and Mist Mountain).
.jpg)
A sea of snowy peaks to the southwest.
.jpg)
Mount Romulus’ unique shape allowed it to be readily distinguished from the many other peaks to the southwest of the summit. Further still, Mount Rae (left) and Opal Range Peaks, Elpoca Mountain and Mount Burney (right), were also visible.
.jpg)
Even 11,000er Mount Joffre (center) was visible beyond the many jagged summits of the Opal Range!
.jpg)
To the west, Fisher Peak (the highest peak in Mount Howard’s range) dominated the view. The highest peak along the horizon to the right of Fisher is another 11,000er: Mount Sir Douglas.
.jpg)
A number of familiar Kananaskis peaks, a couple of ranges to the west, including (from left to right): Mount James Walker, the Fortress, Gusty Peak and Mount Galatea.
.jpg)
Mount Galatea (left) and the Tower (right) rise up beyond the Wedge. More distant still, Eon Mountain, Aye Mountain (both center left) and Mount Assiniboine (another 11,000er – center right) are also obvious.
.jpg)
The beautiful northward panorama showed just how long my approach was! I hiked up the ridge in the center of the photo after hiking all the way up the green valley that leads to the foothills on the center right. Click to see larger and imagine still having to hike all that way down! 😱
.jpg)
Mounts Bogart and Sparrowhawk (to the northwest)!
.jpg)
I hadn’t been expecting to see Banff’s oft-photographed bookends (Mount Rundle and Cascade Mountain) from Mount Howard, but there they were (just beyond Mount McDougall and Old Baldy Mountain)!
.jpg)
Mount Peechee (left) and Mount Aylmer (right) were another pair of Banff peaks visible to the north.
.jpg)
From the peaks to the prairies, wherever I roam…
.jpg)
Mount Bryant (and its many summits) immediately to the north beyond my ascent ridge – Bryant’s true summit is the highest point on the right of this photo.
.jpg)
After taking 360-degrees worth of summit photos 📷 and ravenously consuming what little lunch I had left, I decided that it was about time to start the long hike back (after the obligatory “I came, I saw, I took a summit selfie” shot).
.jpg)
.jpg)
LEFT: The hike down from the summit to false summit #5 was pretty trivial (once my legs got used to going down not up). From #5 to #4, however, I found steep snow, so I switched my poles for an ice axe and used a combination of plunge steps and glissading/ass-sliding to get down. This delivered me to false summit #4, where more ass-sliding quickly took me down to the col below. I could have continued to hike out along the east ridge, which connects to Compression Ridge, however, this looked to involve more ups and down in deep snow, so I elected to save myself some unnecessary post-holing and descended directly to the col between false summits 4 and 3.
RIGHT: From the col, I had 2 options:
1. Retrace my ascent route by going back UP false summit #3, and then down over #2 and #1.
2. Say “Peace Out Howard!” and rip straight down to the creek below on a MASSIVE snow slope that descended 300 vertical meters.
Guess which option I picked? 🤔😎
.jpg)
About a third of the way into my ass-slide to end all ass-slides, I noticed that 5 m of slush was also coming down with me on either side. 🧐 Riding the top of this little slush-alanche, I giddily enjoyed my descent until my slush pile slowed to the point where I decided to extricate myself and start a new (faster) slush-alance the rest of the way down to the valley. 😁
.jpg)
.jpg)
LEFT: Lower down, the slope funneled into a gully, which made for even more delightful ass-sliding. So much better than traipsing down over rubble and scree (although my butt was completely numb by the bottom). NOTE: the slope from the col between false summits #3 and #4 worked spectacularly for this glissade, but the glissade directly down from either false summit to the same creek looked much trickier. I can’t recommend my route highly enough but would be weary of starting down to the creek from a higher point. As always, you should be certain that the slope is stable before starting down it as well. Avalanches still happen in spring/summer conditions on slopes like these…
RIGHT: BEST GLISSADE EVER!!!
.jpg)
After rocketing 🚀 down the steep snow slope from the col, I found myself in a new creek bed that slowly wound its way back down to Canyon Creek. Mercifully, this creek bed was filled with deep, firm snow which made for an exceptionally easy walk out over the next km or so.
.jpg)
.jpg)
LEFT: Looking back at my EPIC slush-alanche ride/glissade/icy ass exfoliator down.
RIGHT: Eventually, the creek that I descended ran out of snow. 😔 Fortunately, the rubble in its center wasn’t bad and the hike out remained relatively easy.
.jpg)
Eventually my descent creek (right) merged with another more easterly creek. This other creek is the one that most scramblers use during their alternate descent of Mount Howard (via its east ridge). From this point, the merged creeks continued easily downhill towards Canyon Creek.
.jpg)
Back in Canyon Creek in record time! On my hike up, it took me 4-hours to get to the summit from Canyon Creek. Thanks to my glissade, I halved that on the way down, putting my ass to work and descending in a "cool" 🥶 2-hours! From here, all that was left was a 5.5-km tired hiker stumble and bumble out to the road.
.jpg)
.jpg)
LEFT: Briefly, there is actually a creek in Canyon Creek. Most of the plod out was, however, dull and dry. Retracing my 5.5-km hike in, I was reminded why I’d avoided coming back to Canyon Creek for 4,041 days! 😂
RIGHT: Finally back at the car, I found my post-scramble treat waiting for me (and it was still icy cold thanks to the trailhead snowbank that I’d mined earlier). All in all, the scramble up Mount Howard ended up being worth the long wait and I lucked out with exactly the early season conditions and views that I’d always wanted for this peak. Give it another 4,000 days or so, and I may even be ready to trudge back up Canyon Creek for my next adventure in this area! 🙃
.jpg)
.jpg)
.jpg)
.jpg)
.jpg)
.jpg)