The Opal Range is quintessential Kananaskis Country. Comprised of nearly vertical strata, the range's sheer limestone faces tower above Highway 40, accompanying valley visitors for some 35 km stretching from Evan-Thomas to Pocaterra Creek. The range's dramatic sawtooth profile makes for excellent eye candy but, generally, poor scrambling. Indeed, most of the range's principle summits are technical climbs on crumbling rock. Mount Hood is a notable exception (except for the crumbling rock part). With a well-documented moderate Kane route to its summit, Hood allows scramblers to access an area typically reserved for those accustomed to roped climbing. As such, Hood has been on my "list" for years so when the opportunity to bag a peak on the Canada Day long weekend presented itself, I soon found myself driving along Kananaskis Trail towards its base.
Accompanied by On-Top.ca fan "Bob the Greek", we made our way to the King Creek Ridge "trailhead" and parked on the shoulder of the road near King Creek's north bank. Mount Hood can be accessed via King Creek Ridge or King Creek itself but Kane's description seems to strongly favor the ridge which, despite its extra elevation gain, features a good trail most of the way. Having snowshoed up King Creek Ridge a few years prior, I was familiar with it so we opted to ascend the KCR route, foregoing the bushwhacking, deadfall and flood debris reported to litter the creek.
.jpg)
Based on my previous experience with the proliferation of trails which litter KCR's base, Bob and I quickly found the more direct "South Southeast Ridge" trail described in Daffern's Kananaskis Country Trail Guide. This trail splits off to the right (south) from the more-travelled "West Flank" trail moments after leaving the highway. Although faint at first, it gains elevation very "efficiently" and soon becomes much more pronounced. Not long after starting up, we found ourselves 500 vertical meters above the highway on KCR's south end. From here, we were granted our first good views of the main Opal Range (which sits behind KCR) and our target for the day: Mount Hood (far left).
.jpg)
After a steep start to the day, the trail follows the more gently angled ridge crest towards twin summits on the north end of KCR. The ridge offers remarkable views of the nearby Opal Range (which Bob is thoroughly enjoying in the photo above) and is a worthwhile destination on its own. With views like this (and after having gained 730 m elevation in a relatively short span), we were happy to “take 5” atop KCR.
.jpg)
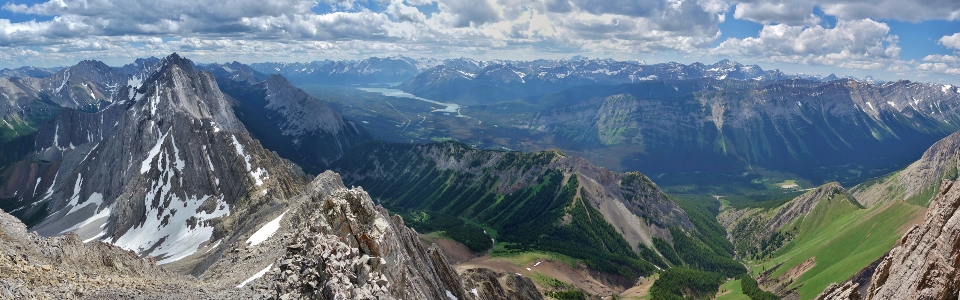
The Opal Range is the highlight of the panorama from the summit of KCR. From this vantage, it’s easy to see why most Opal peaks are technical climbs! From left to right: Mount Evan-Thomas, Mount Packenham, Mount Hood, Mount Brock, Mount Blane, Mount Burney, Mount Jerram and more distant Elpoca Mountain. Click to see larger.
.jpg)
The high point of the Opal Range: Mount Evan-Thomas.
.jpg)
Scouting out the route up Mount Hood from KCR. From here, we’ll drop into the green valley at Hood’s foot and follow the grassy rib in the center of the photo up as grass gives way to brown shale. The shale ultimately leads to a steep, snow-filled gully which funnels into steep, loose terrain above. After picking and choosing our way up this moderate terrain, we’ll reach the Hood – Brock col (center) and follow Hood’s south ridge to the summit (center left). Mouse over for approximate route.
.jpg)
After a pleasant respite atop KCR, Bob drops down to the valley immediately east. Most of KCR’s east face is a sheer drop but a faint cairned trail descends a steep grassy gully between the ridge’s twin summits. Another trip report describes difficult scrambling from KCR to the saddle but you should never have to do anything beyond STEEP hiking if you’re on route.
.jpg)
Okay – you may need to do a bit of bushwhacking and side-hilling to get down KCR but definitely no difficult scrambling! The steep but easy gully down KCR’s east face is 1 or 2 gullies too far south and you’ll end up below the KCR – Hood saddle if you follow it all the way down. Once you’re through KCR’s cliffs, angle north and side-hill/bushwhack towards the saddle (note: Kane recommends side-hilling along sheep trails immediately below KCR's cliffs but doing so would deprive you of a lovely bushwhack). Click here to see the possible easy routes down KCR from higher up on Hood.
.jpg)
From the saddle, wildflower-littered grass slopes would be a delight to ascend if it wasn’t for the fact that you’re now regaining hard-earned elevation that you just lost descending KCR! Going down only to go back up is unpleasant but, on this day, agreeable company and pleasant weather made it less so.
.jpg)
Shooting stars distract from the fact that we’re grunting our way up steep grass but are still lower than the summit of KCR.
.jpg)
Mount Hood looms impressively above Bob as he continues up steep grass.
.jpg)
Following the path of least resistance up alpine meadows towards the top of the brown rubble cone ahead.
.jpg)
Bob patiently waits for me at the base of the (snow-filled) Kane gully. Bob waiting proved to be a common theme on this day and I'm endebted to him for his patience; it seems I'm not in as good a shape as I used to be (I blame fatherhood)! High above the gully, a prominent “V”-shaped notch marks the Hood – Brock col on the ridge above.
.jpg)
Hoping to take advantage of easy travel on early season snow, we opted to kick steps up Kane’s gully. As we made our way up, however, we discovered that it was steeper than it appeared from below; I for one was glad to have crampons and an axe. If snow isn’t your cup-of-tea, the whole gully can be avoided using moderate ledges above and to the climber’s left. These 2 routes merge a short distance beyond the gully’s upper reaches.
.jpg)
Near the top of the gully, snow gave way to ice and slab necessitating a slightly awkward exit on crumbling rock to the climber’s right. (photo courtesy Bob Argiropolous)
.jpg)
Bob grovels up LOOSE rubble towards the Hood – Brock col. At least we’re finally higher than KCR now!
.jpg)
Typical terrain en route to the Hood – Brock col. Helmets were definitely an asset here! (photo courtesy Bob Argiropolous)
.jpg)
Mount Brock (right) and a sea of Front Range peaks appear suddenly upon reaching the Hood – Brock col. Click to see larger.
.jpg)
From the col, an east-facing scree bench sits just below Mount Hood’s south ridge and leads easily to the summit. As another trip report notes, early season ascents of Hood may be complicated by a remnant snowfield. This hazard can be mitigated by sticking closer to the ridge or carrying crampons and an axe. On this day, the snowfield was mostly melted and only a few kick steps were required. (photo courtesy Bob Argiropolous)
.jpg)
Mount Packenham rises dramatically to the north as I take the final steps onto the summit. Despite appearances, Hood’s summit is relatively spacious. (photo courtesy Bob Argiropolous)
.jpg)
Front Range peaks galore looking east from the summit of Mount Hood! Click to see larger.
.jpg)
The more westerly Kananaskis Range – from left to right: Mount Inflexible, Mount Chester, Mount James Walker, Mount Galatea, the Fortress and the Tower.
.jpg)
The more westerly Kananaskis Range (part deux) – from left to right: Red Peak, Mount Rundle (distant), Mount Bogart, Mount Kidd South (foreground), Mount Sparrowhawk, Mount Lougheed, Ribbon Peak (foreground), Wind Mountain and Mount Kidd.
.jpg)
Adjacent Mount Packenham displays uptilted limestone strata characteristic of the Opal Range.
.jpg)
Fisher Peak appears beyond Paradise Pass to the east. Unofficially (but awesomely) named “Ripsaw” rises up to the right of the pass.
.jpg)
Looking east beyond “Ripsaw” (left) towards the Little Elbow River Valley, Mount Glasgow (center), Mount Cornwall (center right), Outlaw Peak (right) and “Little Tombstone” (foreground right).
.jpg)
The many peaks surrounding Kananaskis Valley and Lakes make for a stunning summit panorama from Hood. Click to see larger.
.jpg)
Sun-splashed Tombstone Mountain towers above Piper Pass to the south.
.jpg)
Looking south along the spine of the Opal range. Mount Brock is the most proximate peak in this direction.
.jpg)
Looking beyond Mount Wintour (lower right) towards Elk Pass (right). Highwood Ridge, Grizzly Ridge, Mount Tyrwhitt, Gap Mountain and Mount Pocaterra are all visible in a cluster near Highwood Pass (center left).
.jpg)
The obligatory "group" summit shot. Thanks again to Bob for the company on this beautiful K-Country trip!
.jpg)
Beautiful views of the Kananaskis Lakes to the southwest.
.jpg)
A tighter shot showing the peaks surrounding Upper and Lower Kananaskis Lakes. From left to right: Mount Foch, Mount Sarrail, Mount Joffre, Mount Marlborough, Mount Mangin and Mount Cordonnier beyond the south summit of Mount Indefatigable.
.jpg)
Wave upon wave in a sea of summits beyond verdant Little Lawson and Mount Kent to the west.
.jpg)
The Royal Group (dominated by massive Mount King George) pierces the horizon above pointy Mount Warspite.
.jpg)
Mount Prince Henry (left) and Mount Queen Mary (right) tower above Mount Black Prince.
.jpg)
The “Matterhorn of the Rockies” highlights the view (as it often does on Southern Canadian Rocky Mountain peaks) to the west.
.jpg)
A closer look at the massive peaks beyond Mount Lawson and Kent Ridge’s North Summit – from left to right: Mount Birdwood, Eon Mountain, Aye Mountain, Mount Smuts, Mount Assiniboine and Mount Magog.
A final 360 panorama before leaving the summit of Mount Hood. Click and drag to explore Hood’s summit surroundings.
.jpg)
While the summit photography bug consumed me, Bob had already started down. I found him (waiting patiently as always) at the Hood – Brock col and we soon resumed our descent together.
.jpg)
The “shooting gallery” back down to the Hood – KCR saddle. The loose slope below the col wasn’t all that bad to descend but I wouldn’t want to be here with a large group or without a helmet.
.jpg)
Bob makes his way back down the snowy gully. Despite forecast highs above 30 C, it never felt hot on Hood and the snow was still hard well into the afternoon. I carefully made my way down the hard snow with my axe ready to self-arrest while Bob ended up descending steep, crumbly rock to the skier’s right.
.jpg)
Soft grass feels delightful underfoot after a loose, chossy descent from the col! As we continued to descend towards the saddle, KCR started to look bigger and bigger (click to see larger). With little appetite to slog 150 vertical meters (nearly double the 80 m Kane says it is) back up, we opted to investigate the alternate descent via King Creek (green valley on the left of this photo). Although the creek route was rumored to feature much progress-thwarting flood debris, it had the benefit of not involving anymore uphill travel!
.jpg)
Mount Wintour provides eye candy as we start down the lush green valley towards King Creek.
.jpg)
Looking back up at Mounts Hood (left) and Brock (right) from the northern headwaters of King Creek.
.jpg)
From the saddle, a relatively painless 2.2 km descent brought us to a junction where 2 tributaries combine to form King Creek at the base of Mount Blane. Although the valley was obviously ravaged by 2013’s flooding, a reasonable trail is starting to re-establish itself. Whenever travel on flood debris looked like it would be challenging, we were able to find a faint trail through forest etc. nearby.
.jpg)
Descending via King Creek required at least one million creek crossings. As we continued down, the creek continued to get deeper and faster. Fortunately, every crossing was half-hazardly bridged with logs/stones/boulders/deadfall. Somehow, some way, we managed to make it all the way out without falling in or even wetting our feet! (photo courtesy Bob Argiropolous)
.jpg)
An unusually graceful creek crossing (# 846,215 of 1,000,000) captured on camera (photo courtesy Bob Argiropolous).
.jpg)
Bob hugs the steep canyon walls as King Creek starts to finally near the highway. Our descent via King Creek proved to be quite entertaining and added some pleasant variety to our day out. Most fortunately, the 3.5 km out along the creek took nowhere near the 3 hours that Kane suggests it might. In fact, we managed to complete the entire descent from summit to car in this timeframe.
Based on our experience, I would highly recommend completing Mount Hood as a loop. It really is a quintessential K-Country outing! On ascent, KCR gets you up fast and the views are outstanding. Early on in the day, you probably won’t even care about the elevation loss. Later on, when you’re tired and ready to be down, just head for the creek. On top of avoiding unnecessary elevation gain, this deproach adds variety and was downright fun. As an added bonus, a slip off any of the creek’s many log bridges is sure to refresh on a hot afternoon!
.jpg)
.jpg)
.jpg)
.jpg)
.jpg)
.jpg)