Having made arrangements months ago to scramble with friends on May 29, I was disappointed when my climbing partners pulled the plug a couple of days beforehand. After all, I don’t get out very often anymore (by my standards anyways) so when my wife told me to take a "Matt day" to climb a mountain, I have to take advantage of it! The weather on Sunday the 29th was a real mixed bag with forecasts changing hourly in the lead up to my outing. With the aim of avoiding thunderstorms, I, therefore, checked the forecasts one last time at 5:30am and picked an objective solely based on what area had the lowest chance of precipitation/zap-boom. With thunderstorms forecast from Banff south to the Crowsnest Pass, Longview appeared to be an odd little good weather oasis in the midst of a storm desert. And so my objective was picked for me – Holy Cross Mountain (one of the most impressive peaks in the vicinity of Longview)!
.jpg)
Holy Cross Mountain (left) and Mount Head (right) as seen from Longview, AB. From Longview, the “holy cross” is quite obvious (mouse over if you don’t see it).
.jpg)
The shortest approach to Holy Cross Mountain involves hiking alongside Gunnery Creek and then over Gunnery Pass. While there’s no official trailhead, the Gunnery Creek trail can be found just east of the sign for “Eyrie Gap” (blue sign on the right of the photo) about 1.3 km west of the popular Grass Pass/Pack Trail Coulee trailhead. By this point, I was already questioning my interpretation of the weather forecasts as the sky looked a little dark to the west and the wind was gusting fiercely despite the fact that it was only 8am!
.jpg)
A large cairn marks the start of the Gunnery Pass trail on the climber’s right of Gunnery Creek.
.jpg)
The trail starts up steeply (definitely a good warm up for what’s to come), contouring steep grassy hillsides opposite Gunnery Mountain. Having never explored this trail, I was somewhat surprised to find that Gunnery Creek more closely resembles a canyon in some spots.
.jpg)
Brilliant blue Forgetmenots distract from the vexing wind and overcast skies. At this point I, myself, was seriously considering joining my climbing partners and pulling the plug on this adventure!
.jpg)
Despite the poor start to the day’s weather, the wind abetted and the sun came out as Gunnery Pass came into view – I guess there’s no excuse for turning around now! After setting a solid pace from the trailhead, I reached Gunnery Pass in about 1 hour. Beyond the pass, the trail quickly becomes indistinct. To avoid losing unnecessary elevation on the other side, I left the trail 5 – 10 minutes after leaving the pass and started up a (somewhat) open grassy hillside to the west. There are smatterings of trail here and there but, by and large, it’s easier to just follow the path of least resistance up!
.jpg)
Someone lost something on the grassy hillside! I recalled seeing this antler in Matt Clay’s trip report last year so its sighting was a welcome sign that I was heading in the right direction!
.jpg)
After 5 km of hiking/bushwhacking, Holy Cross Mountain finally comes into full view from atop the “grassy hill” that Nuguara discusses in his route description. From here both of the commonly-ascended routes are apparent. The snow-filled central gully offers easy scrambling on steep, unpleasant rubble while the northeast ridge (right hand skyline) offers enjoyable moderate scrambling with an “exciting” finish. To avoid unnecessary elevation loss, I aimed straight for the central gully (and actually found a good trail through the forest). Click to see both routes in more detail.
.jpg)
By aiming for the gully, I eventually reached a dry watercourse which is easily crossed at its highest point. As I got closer and closer to the peak, the terrain seemed to get steeper and steeper…
.jpg)
Definitely getting steeper! This waterfall/cliff band at the base of Holy Cross was, however, easily overcome on steep, grassy ledges to the climber’s right. Mouse over to see the route that I followed.
.jpg)
Ugh. Who would want to climb that pile of rubble?! Before starting out, I wasn’t overly committed to either route. I decided that I’d climb whichever one was safer. After staring up at the steep gully, however, I found myself starting to trend slowly towards the northeast ridge…
.jpg)
The terrain leading to the northeast ridge was much more pleasant than that which bashed straight up the central gully. By following the path of least resistance, I soon found myself committed to the more scrambly northeast ridge!
.jpg)
From the northeast ridge, the remainder of the scrambling (left) looks to be just as interesting as the panorama of nearby Mount Head. Click to see larger.
.jpg)
Ascending the ridge involves overcoming a series of rock bands, one after the other. Most presented enjoyable hands-on scrambling while at least one (this one!) proved more challenging. All of these bands can be overcome by losing elevation to the climber’s left but what fun would that be? Not to mention the fact that if you don’t like these rock bands, you REALLY won’t like the final summit ridge!
.jpg)
Looking back down where I ascended one of the more difficult rock bands. I had fun climbing this one but was quite pleased to know that I could avoid down climbing it on descent!
.jpg)
Reaching for a hold only to discover a hundreds of millions of years old reef.
.jpg)
The summit (left) within striking distance! The final bash up to the summit ridge (center) was a grunt and, from there, things only got more interesting. Click to see larger.
.jpg)
Wait a minute. I hate exposed ridges. What have I gotten myself into? Normally, the ridge can be by-passed using a steep rubble ramp on the left side of this photo. When I ascended, however, this ramp was completely covered with steep, hard snow. Despite being more psychologically difficult, the exposed ridge route was, therefore, the safest option available. Best take a deep breath and get at ‘er!
.jpg)
Mind your step! Looking back along the exposed ridge from near the summit (camera tilted to reveal the full extent of the drop off to the west). The route is, of course, obvious; stay right on the crest and avoid a slip to either side! Mouse over for further directions.
.jpg)
After the exhilarating ridge traverse, the cairn piled high atop a relatively spacious summit was a welcome sight!
.jpg)
Looking over nearby Junction Hill (immediately to the right of me) and the more impressive peaks of the High Rock Range beyond from my summit perch.
.jpg)
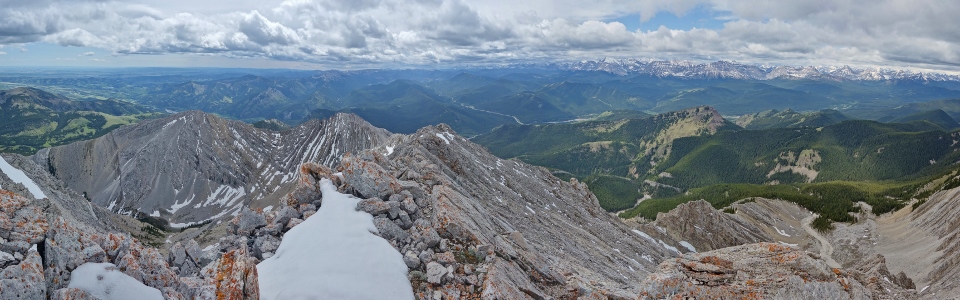
The panorama to the south stretches from prairies to the peaks of the continental divide. Click to see larger.
.jpg)
A closer look at Bull Creek Hills (left) and popular Grass Pass (right). As a child, my parents must have dragged me up Grass Pass hundreds of times. Soon, Grandma and Grandpa can drag Mera up there as well!
.jpg)
Tiny Gunnery Mountain (center) peaks out from behind the impressively folded strata on Holy Cross Mountain’s southeast ridge.
.jpg)
Mount Burke and Plateau Mountain form the eastern edge of the Rocky Mountains to the south.
.jpg)
More snow along the continental divide; from left to right: Baril Peak, Mount Cornwell and Courcelette Peak.
.jpg)
Mount Strachan (far left), flat-topped Mount Muir (center left) and pyramidal Mount McPhail (right) highlight the view to the west.
.jpg)
The razor sharp connecting ridge to Mount Head dominates the panorama to the north while the northeast ascent ridge is obvious on the bottom right. Click to see larger.
.jpg)
Telephoto towards Highwood Pass. From left to right: Mount Tyrwhitt and the peaks of the Misty Range (Mist Mountain, Storm Mountain and Mount Rae).
.jpg)
In the tradition of Sonny Bou, I feel compelled to make a bad Mount Head-related joke so here goes: Head really is the highlight of any summit stay on Holy Cross (pity I was solo). I really wish I’d been able to find Sonny’s summit register limerick on this peak but, unfortunately, the current register on Holy Cross was just placed in fall 2015!
.jpg)
Calgary is faintly visible on the northeastern horizon.
.jpg)
Amen! Also I, apparently, don't remember what year it is.
.jpg)
After putting off the descent for a while it was time to head back across my favorite ridge. They say that the journey of a thousand butt scootches starts with the first one and so, “step” by “step”, I made my way back to safer ground!
.jpg)
Made it! My descent might not have been pretty (as evidenced by the tear in the ass of my pants) but it was effective!
.jpg)
Now all that’s left is hundreds of vertical meters of steep, loose rubble, a couple kilometers of bushwhacking and a hike back out! Although it is possible to glissade the central snow gully, an unseasonably late avalanche fatality on a similar aspect last week had me gun-shy about steep snow gullies so I opted to subject my knees to a rubble-fuck instead.
.jpg)
Another reason to be cautious about glissading the “holy cross”: the gully is interrupted by some bands that would make rather unpleasant waterslides if one got going too fast!
.jpg)
Taking one last look at the peak from the grassy hill (before plunging back into the brush)! Of course the skies clear after I’m down…
.jpg)
A feathered forest friend whose path I crossed while thrashing through the brush back towards Gunnery Pass.
.jpg)
Beautiful spring colors from Gunnery Pass. From here, a quick 3 km jog and a few hundred “yo bears!” brought me back to the highway at the base of this valley. A short time later, I was gorging myself on beef jerky from Longview while reliving the airy summit ridge in my mind – a high sodium conclusion to another awesome day in the mountains!
.jpg)
.jpg)
.jpg)
.jpg)
.jpg)
.jpg)
.jpg)
.jpg)