Boom Mountain is spectacularly situated along the border of Banff and Kootenay National Parks and quickly rocketed up my priority list when I admired its impressive lakeside façade from Mount Bell last fall. While winter ascents of this peak on skis/snowshoes appear to be growing in popularity, there was very little beta available regarding summer climbs. This is likely the result of the need to bushwhack about 4 km up the Chickadee Valley before beginning the ascent in earnest. The valley is definitely enough of a thrash to deter the casual wanderer; indeed a combination of bushwhacking and route-finding issues even turned back the venerable Bob Spirko. I knew that Raf had found a route up Boom Mountain in the summer but he described it as being an easy scramble with a 5.9 crux step. Not wishing to tackle any technical terrain, I was deterred until I noticed that Brandon Boulier described his 2014 summer ascent as easy with “minimal hands”-on scrambling. After reaching out to Brandon, he was gracious enough to share a GPS track from that ascent which effectively mitigated the risk of finding myself off-route on 5.9-type terrain.
Although Boom Mountain was a priority for me, it wasn’t an objective that I was willing to tackle solo. Venturing into a wild valley (which serves as prime bear habitat) on my own seemed fool-hardy. To say that finding a climbing partner for Boom was a challenge is an understatement. After suggesting Boom as a target to other peak baggers several times, I was becoming accustomed to a very lukewarm response. I was, therefore, shocked when I mentioned it to Matt Clay and he jumped at the opportunity to join me! Indeed, our combined enthusiasm for this peak had me wondering if either of us knew what we were getting ourselves into!
.jpg)
Sunny skies over Boom Mountain! While Matt and I had planned to tackle Boom Mountain on my biweekly Friday off, a sudden change in the weather forecast resulted in a Thursday ascent under blue skies and a rainy Friday spent back in the office. Thank God that my boss is flexible! Upon setting out from Calgary at 5:30 am, we weren’t completely certain where to park but discovered that the “Fireweed” pullout at the Alberta/British Columbia border provides an ideal entry point for the approach up the Chickadee Valley. From here, we crossed the highway and started to thrash our way west up the valley bottom aiming towards Boom’s ascent slopes (visible on the left here).
.jpg)
An outlier of Mount Whymper rises up above the noisy creek which flows through the Chickadee Valley. We generally attempted to stay close to this creek, however, the path of “least resistance” occasionally took us elsewhere.
.jpg)
Matt takes a turn on cobweb-clearing duty. Much of the thrash up the valley wasn’t awful and even at its worst, I found it much better than the nightmare of deadfall which clogs some other valleys nearby.
.jpg)
Looks like someone else has been here too (someone big if the size of his/her droppings is any indication)! Not wanting to meet the maker of this mess, we were sure to make plenty of noise as we pushed up the valley through the brush!
.jpg)
Finding evidence of the bear’s leftover lunch! Photo courtesy Matt Clay.
.jpg)
Flower-whacking was preferable to bushwhacking whenever possible.
.jpg)
About 4 km from the highway, we finally reached a rubble-strewn avalanche slope at the base of Boom Mountain’s south face. Although we did not ascend this first major avy slope, the clearing at its base granted us our first good views of the beautiful peaks across the Chickadee Valley. The sublime views of the Chickadee Valley that I'd seen in other trip reports played a key role in motivating my desire to climb Boom Mountain. Click to see larger.
.jpg)
A scenic alpine plateau perched precariously between 2 major rock walls just northwest of Mount Whymper.
.jpg)
About 10 minutes after passing the rubble-strewn avalanche slope, we crossed a second major avalanche path. Although Brandon’s GPS track indicated that his party ascended a few slide paths to the west, we decided that we were sick of bushwhacking and preferred the look of this open grassy slope. Higher up, our route choice would force us into some westwards side-hilling to break through Boom’s summit cliffs at their weakest point near the Boom-Chickadee col . At the very least, we reasoned that this side-hilling could be accomplished at or above the tree line in order to minimize any further bushwhacking!
.jpg)
The sunny slide path proved to be a great spot for a rest and our first lunch of the day. Although we’d completed the bushy approach in only 2 hours, we both found ourselves drained and needed some fuel in order to start the steep ascent.
.jpg)
Onwards and upwards. After grunting our way up the grassy hillside, we began to look for easy side-hilling paths to the climber’s left. Ultimately, we found a good one in the bouldery break between the trees on the center-left of this photo. This break easily granted us access across a couple drainages/slide paths and put us on course for the easiest route to the top (no 5.9 crux step for us!).
.jpg)
Aiming for the gully between 2 large red rock buttresses. The rib on the climber’s left of this gully leads straight up to a weakness in Boom’s summit fortifications.
.jpg)
Mount Whymper and the lush Chickadee Valley beautifully framed by the red rock buttresses.
.jpg)
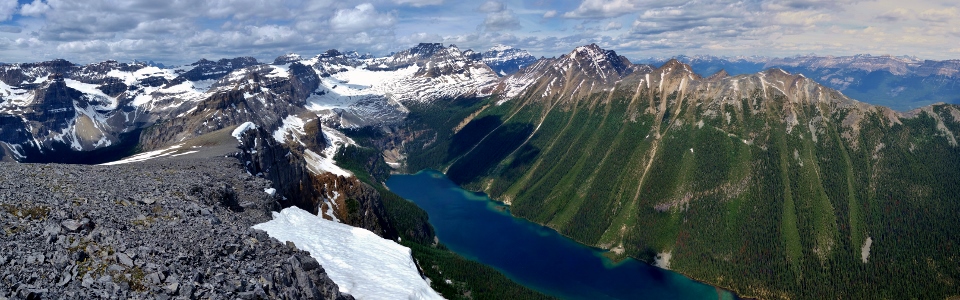
Chickadee Valley panorama featuring Mount Whymper (center left) and the Chimney Peak massif (right). While winter ascents may spare you some of the bushwhack below, they won’t allow you to truly appreciate how beautiful this verdant valley is during the summer months! Click to see larger.
.jpg)
At the top of the ascent rib, we easily picked our way up through weaknesses in Boom Mountain’s otherwise impressive crown of summit cliffs. There are probably many different scrambling possibilities here but we found an easy route through in the center of this photo.
.jpg)
Matt makes his way up the crux step (easy but loose scrambling – helmet recommended!).
.jpg)
After a few brief scrambly bits, Boom Mountain’s expansive and scenic summit plateau is reached. The obvious peak is actually a false summit with the true summit residing a mere hundred meters or so beyond.
.jpg)
And BOOM goes the dynamite! The million dollar view is spectacularly revealed from the false summit! Click to more fully enjoy!
.jpg)
The headwall at Boom Lake’s western end rises steeply towards the Mount Quadra/Mount Bident massif.
.jpg)
Massive Mount Temple beyond a set of still-frozen tarns in Consolation Pass.
.jpg)
Boom Lake’s brilliant blue water glisten like a jewel at the foot of Mount Bell.
.jpg)
Looking down 870 vertical meters towards the obvious log “boom” damming Boom Lake’s outlet.
.jpg)
Skoki scrambles to the left including Fossil Mountain (with its characteristic snow patch), Brachiopod Mountain and Anthozoan Mountain. The north end of the Protection Mountain massif (Bullwark and Armor Peaks) can bee seen in the center while Mounts St. Bride and Douglas rise up over Pulsatilla Mountain to the right.
.jpg)
Soaking in the scenery high above Boom Lake with Chimney Peak (left), Mount Quadra/Mount Bident (center left), Mount Temple (center right) and Mount Bell (right) as my backdrop! Matt and I must have taken hundreds of photos from Boom Mountain’s false summit (which sports a much better view of Boom Lake than the true summit a hundred or so meters further east).
.jpg)
After fully admiring the view from the false summit, we followed the corniced ridge east to the true summit, admiring the views of Storm Mountain across the highway along the way.
.jpg)
While we loved the view from the false summit, the panorama from the true summit wasn’t bad either! ;-)
From left to right: Pilot Mountain, Mount Brett, Storm Mountain, Mount Ball, Stanley Peak, Mount Whitetail, Mount Verendyre, Mount Haffner, Numa Mountain, Floe Peak, Vermillion Peak, Foster Peak, Mount Whymper, Mammoth Peak, Tumbling Peak, Rockwall Peak, the Chimney massif and the distant Mount Goodsir. Click to see larger.
.jpg)
Boom Mountain’s impressive summit cornice curves elegantly towards Mount Ball and Stanley Peak.
.jpg)
Massive Mount Ball is the most remote scramble included in Kane’s guidebook.
.jpg)
Telephoto of Stanley Peak and the beautiful Stanley Glacier.
.jpg)
Seeing double: 2 x Matt on top of Boom Mountain!
.jpg)
Looking deeper into Kootenay National Park: Mount Verendyre (left), Floe Peak (center) and Foster Peak (right) form an impressive backdrop for the high saddle separating Mount Haffner (left) from Vermillion Peak (right). Numa Mountain can be seen in the middle ground beyond Haffner-Vermillion saddle.
.jpg)
Pyramidal Mount Whymper directly across the Chickadee Valley.
.jpg)
Thanks to good visibility, distant Mounts Gaggin and Conrad (70 km away) are just visible beyond Mount Gray (left) and Mount Drysdale (right).
.jpg)
Matt enjoys a fine view of the upper Chickadee Valley with his second lunch of the day.
.jpg)
A closer look at Mount Goodsir (the second highest peak in the southern Canadian Rockies) beyond the Chimney Peak massif.
.jpg)
A large glacier occupies the cirque between Chimney Peak (left) and Mount Quadra/Bident (right). Several of the Ten Peaks can be seen beyond the Chimney-Quadra col.
.jpg)
Deltaform Mountain (left) and Mount Hungabee (right) stand out amongst the other summits of the Valley of the Ten Peaks.
.jpg)
Trying to take it all in before reluctantly heading back down.
.jpg)
Not the way I want to get down! An impressive 900 m plunge down to the Boom Creek Valley!
.jpg)
While we were reluctant to leave Boom Mountain’s stunning summit, the picturesque views to the west as we hiked back down the gentle upper plateau helped to lure us gradually down slope. Click to see larger.
.jpg)
Boom Lake is nothing short of magnificent.
.jpg)
Snowy red cliffs provide a wonderful contrast to the lush green valley and cerulean blue waters below.
.jpg)
It looks like neither Matt wants to go back down (this might have something to do with the knowledge that hundreds of vertical meters of rubble and kilometers of bushwhacking await us down there). Best enjoy these views while we’re still up high!
.jpg)
From above, a gray-colored snow-filled gully marks the beginning of the descent from the upper plateau. Fine views towards Mount Whymper and the Chickadee Valley made this a good place to pause for pain pills (what descent would be complete without Ibuprofen?).
.jpg)
Matt carefully picks his way back down through the weakness in the rock bands guarding the summit.
.jpg)
Side-hilling our way back to the grassy ascent gully. While it looks like any of the many drainages/slide paths in this vicinity will work for descent, heading down immediately only serves to prolong the bushwhack below!
.jpg)
Indian Paintbrushes are just starting to take over the hillsides. Summer is here early (June) this year!
.jpg)
Lunch part III at the base of the slide path. I’m not sure that either of us was even hungry but at least by taking a break here we could put off the bushy Chickadee Valley exit for a few minutes!
.jpg)
If we’d wanted to stick around, this little fellow could have served as our first dinner. Once we made our way back down to the creek in the valley bottom, we were surprised to see fish enjoying the crystal clear mountain waters.
.jpg)
Following the scenic creek back to the highway. On descent, we tried to stay much closer to the creek than we had on ascent. During a wet year or following a winter with a heavy snowpack, this route down could be quite boggy but, thanks to a mild winter and warm spring, the ground was solid (enough). Indeed, either travel was easier near the creek or we were really motivated to GTFD as our deproach took only 80 minutes (a full 40 minutes faster than our approach in the morning)!
All in all, the bushwhack up the Chickadee Valley really wasn’t that bad. In fact, I ended up really enjoying the sense of being somewhere untamed and truly wild. While Matt and I might not have known what we were getting ourselves into on Boom Mountain, I’m happy to confirm that we got a highly rewarding summit panorama and some great type II fun out of it! As Alan Kane once said: “don’t let a few trees deter you!”
.jpg)
.jpg)
.jpg)
.jpg)
.jpg)