Elevation: 2998 m
Elevation Gain: 1100 m
Dolomite is a mineral composed of calcium magnesium carbonate which is formed when water containing magnesium seeps into limestone sediments. The resulting rock is harder than limestone and is, generally, preferred for climbing. Dolomite is relatively rare in the Canadian Rockies and is found in the upper portions of Dolomite Peak which have been weathered into a series of impressive towers. The peak was named for its resemblance to the Dolomite Range of the Italian Alps in 1897 and was first ascended by J. Monroe Thorington and Peter Kaufmann in 1930.
My Ascents:
August 11 2013.
Trailhead: Dolomite Pass Parking (Roadside)
After a series of brutal (but scenic) scree slogs last weekend, Brianne demanded that I take her up a peak which featured entertaining hands-on scrambling this weekend. I, of course, was happy to oblige! I was also keen to try out my new birthday present (a “GoPro” helmet camera) on terrain that might make for more entertaining viewing. Having stared over at the beautiful form of Dolomite Peak and its many towers numerous times from adjacent Cirque Peak, I was certain that the scramble up would be “entertaining” but, until now, the “difficult” rating assigned by Kane and the intimidating vertical appearance of the peak’s towers had always kept me away.
Brianne makes her way up the steep unsigned Dolomite Pass ski trail a few minutes beyond the trailhead where Highway 93 crosses Helen Creek.
After about 20 minutes on the pleasant trail in the trees, the trail descends slightly to Helen Creek and crosses in the middle of an open avalanche gully. From this gully, we were granted a fine view of the many towers of Dolomite Peak. The highest tower is the fourth from the north (left) and the route ascends between towers 3 and 4. It’s a good idea to study the form of the towers intently from lower down and to keep track of which drainages on the lower slopes emanate from which gullies between the towers. Once you’re at the vertical base of the towers, they all look alike so it’s prudent to pay close attention on ascent and to set yourself up for success later on in the day! From this first avalanche gully, the trail continues a further 5 minutes to a second avalanche gully which we used for ascent.
I obsessively studied the form of Towers 1, 2, 3 and 4 from below. Tower 2 is an impressively steep and sheer buttress and is the easiest of the lot to identify. Once you can identify Tower 2, it’s a lot easier to figure out which Towers 3 and 4 are.
Brianne carefully negotiates the crossing of Helen Creek.
Eager to get to the “hands-on” scrambling, we started up the second avalanche gully as soon as we arrived at it aiming for the open slopes on the edge of the forest on the left-hand side of the steep drainage ahead. Leaving the trail as soon as we got to the second avalanche gully proved to be a mistake.
If we had continued another minute or two on the trail, we would have come to the rocky/muddy watercourse running down the middle of the avalanche slope, thereby avoiding this unpleasant bit of bushwhacking.
We did finally thrash our way through the thick brush into the rocky/muddy watercourse and travel was easier from this point on. The steep slopes ahead on the left side of the drainage were technically easy but they were VERY loose. At one point, Brianne tested a hold on a rather large 200 – 300 lb boulder only to have the whole thing pull out when she actually put her weight on it. The boulder nearly crushed her but fortunately she was fleet of foot and was able to dodge it. This served as our notice that no hold was safe on Dolomite Peak and we had our brain buckets on from this point forth.
The boulder dodger makes her way up the final steep bit on the lower mountain onto more gentle terrain with improving views of the Crowfoot Glacier in the background.
The more gentle terrain did not last long and the remainder of the ascent to the base of the summit towers took place on terrain much like this. At this point the forms of Towers 2, 3, 4 and 5 are still readily discernible. We ascended all the way to the base of the summit towers on the climber’s right of the drainage between Towers 4 and 5. Once at the base of the summit mass, we traversed along ledges past the 4/5 gully and into our desired ascent gully (3/4).
Studying the shape of the highest Tower (4). From this angle, the peak is certainly intimidating!
It seems that the higher you go, the steeper the terrain gets!
Brianne enjoys the panorama (and a rest) from the cliffs at the base of the summit mass. From here, we worked our way along good ledges to the correct ascent gully. Click to see larger.
Working her way along the ledge.
Death from above. Brianne contemplates a rather large chockstone along our traverse. I don’t think that the helmet would help in this instance. She didn’t linger long.
When we arrived at the correct gully, we were met by a reassuring cairn and a small waterfall running down a rock band in the center. We easily climbed the right-hand side of the waterfall which was less exposed than the left-hand side (despite the preponderance of cairns on the left). Above the waterfall, the gully opens up to the view of the chockstones shown above. These can be easily overcome on a good ledge to the right (note the cairn).
Brianne makes her way up above the small waterfall at the mouth of the gully. If the scrambling here doesn’t stimulate you the view (at the very least) should!
A rare action shot of me (she stole the camera) as I scramble up a good ledge to the right some chockstones.
The Breezy Goat in its element!
Above the waterfall and first ledge, the gully opens up further, degenerating into a scree slog (I thought we were seeking to avoid those this week)!
The 3 m high “shark fin” rock that Kane describes dividing the gully near the top. There is a thin and exposed ledge with a cairn by this “fin”, however, this is not the safest route to the top. We didn’t like the exposed look of the ledge and continued upwards finding a much better ledge (with a lot more cairns) just below the top of the gully. A good reminder to not blindly follow cairns! Never assume that the person who built the cairn had a clue when it comes to route finding!
Brianne gaining the “correct” (safer might be a better choice of words here since many ledges could work depending on your skill level, however, in my opinion, the safest way to the top of the mountain is always the “correct” route – and this is my blog so we’ll stick with “correct”!) ledge. Note the cairn on a small ledge on the right and how close we are to the top of the gully.
“It’s GoPro Time!” With the gully behind us, I took my new GoPro helmet camera out for a test drive on what Kane describes as the “exciting finish” to this scramble. The scrambling up here was every bit as fun as it looks! Thanks to Chris for an awesome birthday/wedding present!
Looking back at 3 cairns which mark the correct ledge on which to depart the gully.
Brianne using a rather unconventional climbing technique just above the ledge. You can try to figure out how she got into this position at the 4:20 mark of the video above.
She’s managed to right herself. Above the ledge, we followed this steep gully the remainder of the way to the summit. The scrambling is steep and very fun but I never found it exposed. On descent, it took us a moment to correctly identify our ascent route and while we poked about looking for the right way down, we were met with a fair bit of exposure. Exposure is never far away near the top of Dolomite Peak, however, if you are on the “correct” route, you should not encounter anything more difficult than steep moderate scrambling. I suspect that the “difficult” rating for this peak is due to potential complications with route finding (a number of previous register entries suggest that route finding is a common problem on this peak). Fortunately, we managed to stay on route and enjoyed ourselves thoroughly!
Looking back down our ascent route from near the top. Mom: It’s not as bad as it looks, I swear! ;)
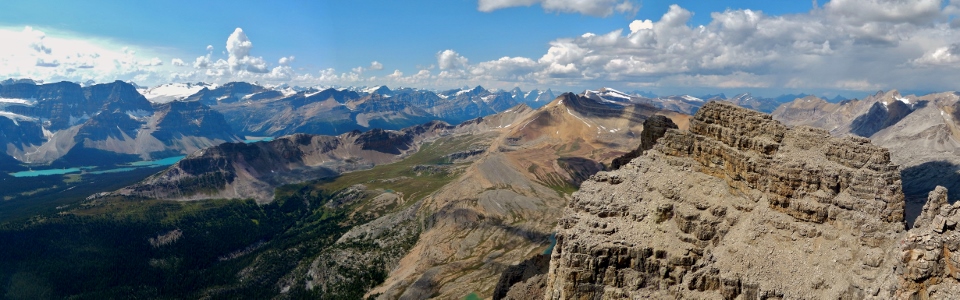
A stunning panorama from the summit of Dolomite Peak. Click to see larger.
The Crowfoot Glacier clings to a bench on Crowfoot Mountain high above the bright blue waters of Bow Lake. Glaciated Mount Gordon (center) and a distant Mont Des Poilus (right) can be seen in the distance.
Bow Lake on the other side of Crystal Ridge and the popular Helen Lake trail. Crowfoot Mountain and Mount Thompson on the other side of the lake while distant Wapta Icefield giants (from left to right) Mont Des Poilus, Mount Collie, Mount Rhondda, Mount Habel, Mount Baker, Mount Mummery and Trapper Peak dominate the horizon.
Mount Rhondda (center-right) and Mount Habel atop the Bow Glacier beyond Portal Peak (right).
Mount Mummery and its own distant icefield beyond Mount Baker and Trapper Peak.
Looking north towards the green meadows surrounding Helen Lake at the foot of the red rocks of Cirque Peak. Katherine Lake can be seen far below at the base of Dolomite Peak.
The distant Lyell Icefield to the north.
Helen Lake.
A great view of the impressive cirque for which Cirque Peak is named. Glaciated Observation Peak just beyond. Distant peaks include Howse Peak, White Pyramid and Mount Chephren (on the left) and many-towered Mount Murchison on the right.
As per usual, Brianne spent her entire time at the summit with her nose in the register.
Panorama to the south and east looking down the remaining towers of Dolomite Peak towards Mount Hector. Click to see larger.
Summit shot of the protagonist. Does that make Brianne the antagonist?...
Looking down the remaining towers of Dolomite Peak from between 2 miniature towers on the summit.
Noseeum Peak, Mount Andromache and Mount Hector to the south.
Little Hector dwarfed by Mount Hector.
Panorama of the massive peaks of the continental divide to the south and west. Click to see larger.
Mount Temple and the Lake Louise group through the haze to the south.
Giants of the Lake Louise group including (from left to right):Deltaform Mountain, Mount Lefroy, Mount Hungabee and Mount Victoria.
Despite some afternoon haze, we could still see as far as Mount Assiniboine (left), Storm Mountain (center) and Mount Ball (right).
Cathedral Mountain juts out of the crowd of glaciated summits in Yoho. The distant Goodsirs can be seen to the left while Mount Stephen’s form is visible through the haze to the right.
Still reading…
Outliers of Watermelon Peak to the east with Mount Willingdon in the distance.
Noseeum Peak with the peaks of the Skoki area beyond.
Molar Mountain, Mount Douglas, Mount St. Bride and tiny Oyster Peak.
I convinced her to put down the register for long enough to take a photo of the two of us on top of one of my favorite peaks to date!
All geared up to start heading down.
Let the down climbing begin!
Nearing the bottom of the gully.
Once you’re out of the gully, the quickest descent is straight down the drainage between Towers 3 and 4 below. This line of descent is not as easy as Kane makes it sound, however, it is the most direct line and avoids any further side-hilling etc.
A little scree respite before the first of several cliff bands in the descent gully. We were able to easily get down all of the cliff bands with minimal hands-on scrambling by detouring well to the skier’s right. Once back down at the trees, we stayed near the edge of the forest on mostly open grassy slopes before eventually dropping down into the watercourse when it was easy to do so (the first chance to drop into the watercourse from the tree line is steep and not the easiest although it would be doable).
A colorful alpine garden on the foot of Dolomite Peak.
Looking back up the 3/4 watercourse to the steep faces of Towers 2, 3, 4 and 5 shortly before my camera battery died. Luckily, it was mostly forest from this point down!
.jpg)
.jpg)
.jpg)
.jpg)
.jpg)
.jpg)
.jpg)
.jpg)
.jpg)
.jpg)
.jpg)
.jpg)
.jpg)
.jpg)
.jpg)
.jpg)
.jpg)
.jpg)
.jpg)
.jpg)
.jpg)
.jpg)
.jpg)
.jpg)
.jpg)
.jpg)
.jpg)
.jpg)
.jpg)
.jpg)
.jpg)
.jpg)
.jpg)
.jpg)
.jpg)
.jpg)
.jpg)
.jpg)
.jpg)
.jpg)
.jpg)
.jpg)
.jpg)
.jpg)
.jpg)
.jpg)
.jpg)
.jpg)
.jpg)
.jpg)
.jpg)
.jpg)
.jpg)
.jpg)
.jpg)
.jpg)
.jpg)